As you have seen in previous worksheets, it is easy to set out collections using FOX. In this tutorial we will go through how easy it is to set out lists of repeating elements in a table.
Remember that you must target a container element in your set-out XPath for this to work.
SYNTAX
A FOX set-out for a list element looks like the following in grid view:

As you see, the simplest form of the set-out has a match attribute that contains the XPath of a list element and a mode.
CONCEPTS
This following uses XX_EMPLOYEEMODULE, and consists of a company maintenance screen. The schema looks like this:
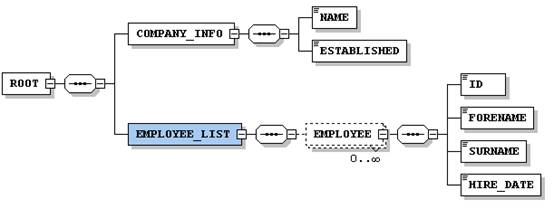
The EMPLOYEE_LIST is the container element of the repeating element, EMPLOYEE.
displayOrder
There is an attribute that you can use to set out elements contained in a list item in a different order than the order they appear in the XML. This is called displayOrder and is mostly used with the fox namespace, i.e. fox:displayOrder.
prompt-short
The prompt attribute is used to give an alternative title than the element’s name. It will also set the name of phantom elements. E.G. You have a phantom element named “phantom-view”. When given the prompt “View”, all instances of the element will also be called “View”.
The prompt-short attribute is used to declare an alternative title only. E.G. You have a phantom element named “phantom-view”. When given the prompt “View Module” and prompt-short “View”, the column will be titled “View”, while all instances of the element will be called “View Module”.
Phantoms will be covered in a later chapter.
EXAMPLES
The set-out in the Concepts section produces the following table output:
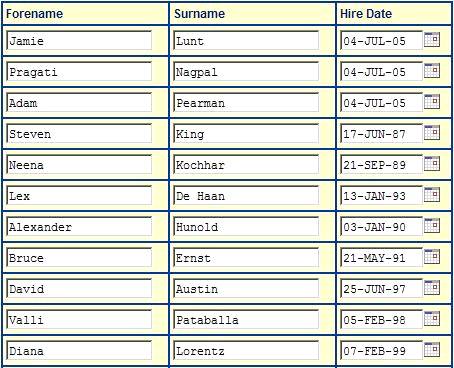
The reason why this table does not have a title is that for the list element, EMPLOYEE_LIST, the prompt attribute is set to “”. The prompt attribute of a list element is the title that is displayed at the very top of the table.
For each of the columns there is a title, for example Forename, Surname and Hire Date above. These can be set by specifying the prompt attribute for each of the elements. If the prompt attribute is not set, the column title defaults to an init-capped version of the element name.
EXERCISES
Please use your XX_ORDERMODULE (where XX are your initials) file for the following exercises.
Exercise 1
Create a new namespace called “products”. Change the namespace used on the ORDER_ITEM_LIST and its elements from “order” to “products”. Finally, change the namespace used in the set-out for ORDER_ITEM_LIST from “order” to “products”.
Exercise 2
Change the title of the ORDER_ITEM_LIST using the fox namespace so that it reads “Ordered items”. The fox namespace is always enabled which means that no matter what namespace you use to set out the list, its title will always be “Ordered items”.
Exercise 3
Change the default column titles as follows: QTY = “Quantity”, PART_NO = “Part Number”, DESC = “Description”, UNIT_PRICE = “Price per unit” and PRICE = “Total Price”.
Exercise 4
Make the UNIT_PRICE editable in the products namespace.
Exercise 5
Change the order in which the data is displayed so that PRICE is displayed as the first column (use displayOrder).