On this Worksheet, you will learn how to get FOX to output fields in a form-style layout.
SYNTAX (re-cap)
The fm:set-out command takes the following syntax: -
<fm:set-out match=”XPath” namespace:mode=”XPath” [namespace:attribute=”attribute-value”, namespace2:attribute=”attribute-value”, ...] />
The match attribute tells FOX what elements to set out on the screen. The namespace:mode attribute tells FOX which of the elements within the scope of the XPath should be displayed and when.
The optional namespace:attribute=”attribute-value” allows you to override certain attributes for a given name. They will be discussed on this worksheet.
CONCEPTS
One of the most useful functions of the <fm:set-out> command in FOX is its ability to target a whole group of elements and set everything out at once. If you are setting out a large amount of repeating data, FOX can either set it out in a form style or list style.
Going back to the XX_EMPLOYEEMODULE XML, you will notice that the schema looks like this:
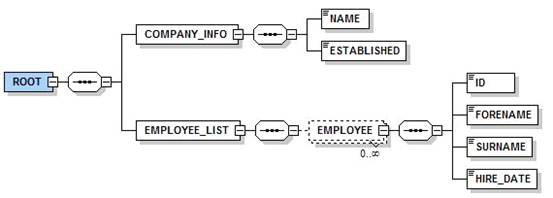
You have a repeating Employee element which contains an ID, Forename, Surname and a Hire Date. This means that the Schema permits multiple Employees all with IDs, Forenames, Surnames and Hire Dates.
At the moment, the way the XX_EMPLOYEEMODULE is set-out is in the style of a list. You may want to set it out as a form, depending on the visual look you’re aiming for. FOX can cope with this as well and with a few tweaks, using the presentation attributes from the previous chapter and these ones, you can get it to look like you want it to:
Parameter |
Comments |
Common Values |
formMaxCols |
Maximum number of columns allowed in the form |
Integer |
formColChars |
Maximum number of characters allowed per column |
Integer |
fieldClass |
Use this to apply a CSS class |
String |
fieldStyle |
Use this to assign different style sheet attributes |
|
fieldxlock |
Lock the position of the output in the X-axis by X columns |
Integer |
fieldylock |
Lock the position of the output in the Y-axis by Y rows |
Integer |
display-preference |
Gives a namespace preference when setting out NB: This currently does not work |
String |
displayOrder |
The order that the data items are dropped on the screen |
Integer |
debug |
Displays a grid in table view and list view |
Boolean |
layoutProcess |
Change the algorithm used by FOX to set-out collections |
normal |
promptLayout |
The position of the prompt relative to the editable data box |
north |
The most important fox attributes that you will use are formMaxCols, formColChars, fieldxlock, fieldylock, displayOrder, debug and promptLayout. The promptLayout attribute can align the prompt either “north” or “west” of the field, the default being west.
You should think of the way that a FOX module is set-out like a grid:
Name |
Address 1 |
||||
Age |
Address 2 |
||||
Address 3 |
The name prompt is at X-coordinate 1, Y-coordinate 1. Debug mode will show you the grid that FOX uses to set out items. The number of Form Columns is 6.
Debug is especially useful as it outlines table cells with gridlines that FOX uses to decide where data goes and will help you change the layout accordingly. Below is an example of a fox form displayed in debug mode:

All of the cells with an ‘x’ in are available for you to move the field prompts into using fox:fieldxlock=”i” and fox:fieldylock=”j” where i and j are integers referring to coordinates on the grid (except the top line).
There are ways you can trick FOX into making fields span multiple cells or spanning fewer cells than it should by using the Field Width attributes to make the fields larger/smaller than they should be.
NB: If you include prompt hints or entry-helper icons, you should set the Field Width attributes to be 3 characters longer to accommodate the extra icon. If you do not do this, it may affect the set out you desire.
You can also control the gap between fields/prompt/edge of cells with stylesheet styles or classes (fieldClass or fieldStyle).
Finally, you can change the way FOX outputs lots of data to the screen using the fox:layoutProcess attribute which changes the way fox drops the data to the screen. Normal is the default and will use all layout attributes to fit as many fields as it can on a line then insert a new line. Newline inserts a new line after each item hit in the match attribute of the set-out. Tight would force FOX to fit elements into as little space as possible, but the order would be random.
EXERCISES
Please use your XX_EMPLOYEEMODULE (where XX are your initials) file for the following exercises.
Exercise 1
Modify the <fm:set-out> “match” attribute so that it doesn’t point to the list container “EMPLOYEE_LIST” (which causes it to set out the data as a list), but rather the repeating element “EMPLOYEE” which FOX uses to set-out the data in form view.
As you can see, setting-out as a form without tweaking makes it look rather messy.
Exercise 2
Return the set out to list view.
On <fm:set-out match=”/ROOT” ...>, set Debug to “true” and refresh the module so you can see the grid. By default, it is 6 columns wide.
Add attributes such that it is now 4 columns wide and each column can have upto 30 characters.
Finally, set Debug mode to “false”.