In order to display data from the data DOM onto the screen, we need to make use of the fm:set-out command, namespaces, and attributes. Data passed into the module is stored in XML format in the data DOM. The most commonly used data DOM is the “root” DOM. This can be accessed from the testing bar by clicking on :{root}. The content of the DOM is what can be displayed on the screen. DOMs are further explained on a later worksheet.
MINI WALK-THROUGH
- Get the file EMPLOYEEMODULE.xml from the Training/FOX folder in PVCS.
- Create a personal copy in your FOX Training folder in My Documents and rename it XX_EMPLOYEEMODULE.xml (where XX are your initials).
- Right-click on the file and go to Properties. Un-tick the Read-only box.
- Open your copy of XX_EMPLOYEEMODULE.xml in XML Spy.
- View the module in text view and change the value of fm:name to XX_EMPLOYEEMODULE. Save the module.
This module will be referenced throughout this sheet.
SYNTAX
The fm:set-out command has the following syntax:
<fm:set-out match=”XPath” namespace:mode=”XPath”/>
The match attribute tells FOX what elements to set out on the screen. The namespace:mode attribute tells FOX which of the elements within the scope of the XPath should be displayed and when.
CONCEPTS
The fm:set-out command traverses along the XML Schema according to the XPath that has been specified. It will then set out all the elements within the scope of the XPath with the corresponding mode namespace.
NB: Lists must be set out separately and the XPath must specify the list container.
As the set-out command traverses the schema, it generates fragments of XHTML, which are then displayed to the user.
There are several rules to be aware of when using set-out:
- fox:ro or namespace:ro can be used on simple types and collections
- fox:edit or namespace:edit can be used on simple types only
- Data elements must exist in the DOM; set-out does not create elements
- Use the match attribute to target what to display
- Use namespaces to specify what display mode is required
NB: set-out looks at the matched structure and decides whether to display and descend. In order for set-out to descend, namespace:ro needs to be used on complex elements.
Example
Take the following XML Schema:
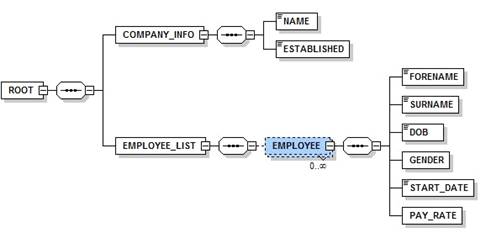
The following set-out will display the COMPANY_INFO:
<fm:set-out match=”/*/COMPANY_INFO” emp:mode=”.”/>
This tells FOX to set out all elements below the COMPANY_INFO element that have the namespace emp attributed to them. This refers to the namespace – emp, the attribute – mode, and the XPath – “.” (period).
NB: When writing XPath, a period (.) always evaluates to “TRUE”. This is mostly used.
NB:The “fox” namespace is always set-out and can be used for displaying elements you want permanently visible.
To set out the EMPLOYEE_LIST, we must use a separate set-out command:
<fm:set-out match=”/*/EMPLOYEE_LIST” emp-list:mode=”.”/>
As mentioned earlier, the set out command uses a namespace to see which elements should be set out. The namespace is declared at the top of the module within the xs:schema element, and has the following structure:
xmlns:namespace=”http://www.og.dti.gov/fox”
You will find the emp and emp-list namespaces in the XX_EMPLOYEEMODULE.xml file.
Each element you want to set out needs one of two attributes:
· Read-only - namespace:ro=”XPath”
· Editable - namespace:edit=”XPath”
The read only attribute sets out the element as read only text, while the edit sets the element out as an input box. These are added to the elements in the schema at the bottom of the FOX module.
AUTHENTICATION
By default, all fox modules only allow access is the user is authenticated (i.e. logged in). When you first look the module code for the follow excersies, you will notice, that near thje top of the module is says:
<fm:control>
<fm:authentication>not-required</fm:authentication>
<fm:control>
This allows you to create a module that does not require authentication. Whilst this is fine to include for training and testing purposes, it should be removed once a module is completed.
EXERCISES
Exercise 1
In the XX_EMPLOYEEMODULE module, change the namespace that sets Company Info out to comdata, and the namespace that sets Employee List out to empdata. Don’t forget to change the namespace definition at the top of the module.
Be sure to set up another Clobber entry to make sure your changes work.
Exercise 2
In the XX_EMPLOYEEMODULE module, make Company Name and Established editable, and change the Employee Forename and Surname to read only.
Exercise 3
Open XX_ORDERMODULE in Internet Explorer (using MODLAUNCH) and click on :{root} in the developer bar. In the window it opens, you will see lots of data has been populated for you.
Create a schema for this data in the XX_ORDERMODULE. Make sure you put the correct data types and the max number of characters for each element, also remember to create your own namespaces, rather than using the fox namespace.
Exercise 4
In the XX_ORDERMODULE module, set out all the populated data on the screen. You may need to use more than one set out command.
Make the Customer information editable, but the list of orders must all be read only.